Channels#
Channels and subchannels are the primary means of organizing and managing your repository, providing a hierarchical structure that enables efficient categorization, access control, and distribution of packages, environments, and other artifacts.
A channel is a location in the repository that contains artifacts that have been mirrored, uploaded, copied, or moved. Channels help group related artifacts based on projects, departments, teams, or other high-level categories.
Subchannels (referred to as labels in anaconda.org) provide an additional hierarchical level within your channels. While subchannels reside within channels, they operate independently and are not constrained by the configurations applied to the parent channel, meaning that subchannels can have their own unique configurations, privacy settings, policies, etc.
When a user logs in for the first time, a user profile and a default channel are automatically created for them. The default channel’s name is identical to the user’s username. If the username is an email address, only the portion before the @ symbol is used as the channel name. Since channel names are restricted to a limited set of characters, certain characters in the username might be replaced with an underscore _ to meet naming requirements.
Note
Channel names must be unique. If your username is already in use as a channel name, a new channel will not be generated for you on your initial login.
Creating channels#
Tip
Channels can be created from the Dashboard, My Channels, or All Channels pages.
Click Add Channel.
Complete the Create Channel form.
Click Submit.
Open any channel from the Dashboard or from the My Channels or All Channels pages.
Open the Manage dropdown menu and select Add Subchannel.
Complete the Create Subchannel form (identical to the Create Channel form).
Click Submit.
Create channel form#
The Create Channel form allows you to set configurations for a channel. Let’s take a look at the different sections of the Create Channel form and what configurations they control:
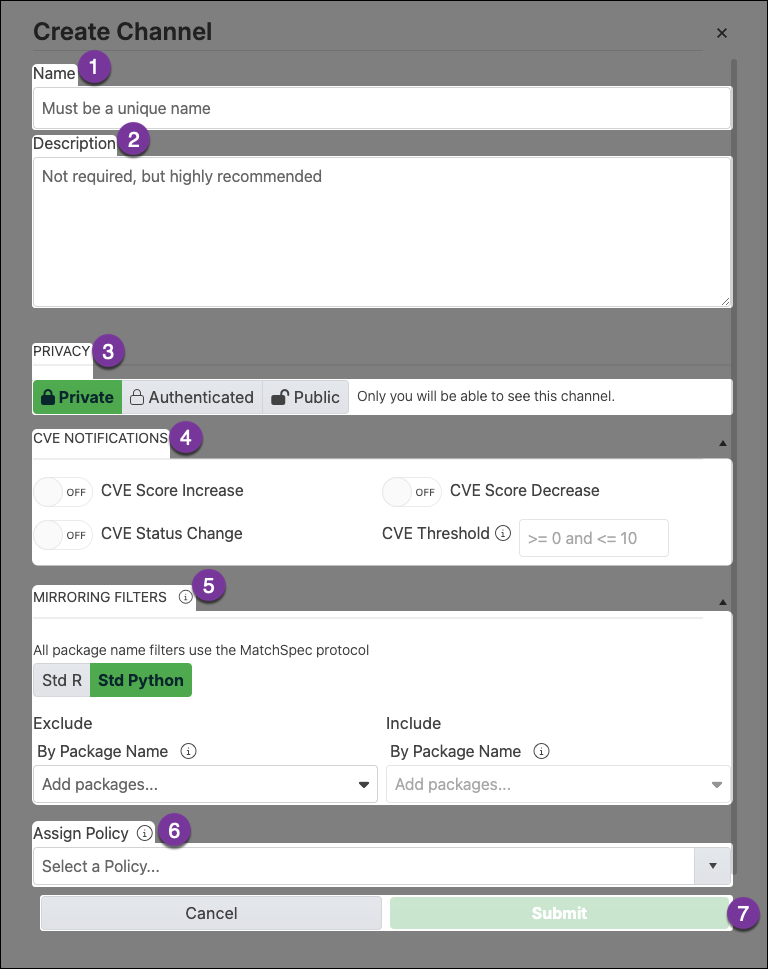
- Name
Enter a unique name for your channel.
- Description
Enter a brief description of the channel and its intended use.
- Privacy
Set the privacy level of your channel:
Private - Private channels and subchannels can only be accessed by the channel creator, administrators, and users who possess a resource token for the channel.
Authenticated - Authenticated channels are accessible only to licensed users of Package Security Manager.
Public - Public channels are accessible by anyone who has the channel’s address and access to the network that is hosting it.
- CVE Notifications
Set configurations for when CVE notifications are generated. For more information, see CVE notifications.
- Mirroring Filters
Set filters for packages if you are mirroring from PyPI or CRAN repository sources. Channel mirroring filters must use MatchSpec protocol to exclude and include packages by name.
Note
Dependencies are not automatically mirrored when using MatchSpec protocol.
- Assign Policy
Choose an available policy to assign to a conda channel. For more information, see Policies.
- Cancel / Submit
Quit creating a channel or submit your channel for creation.
Managing channels#
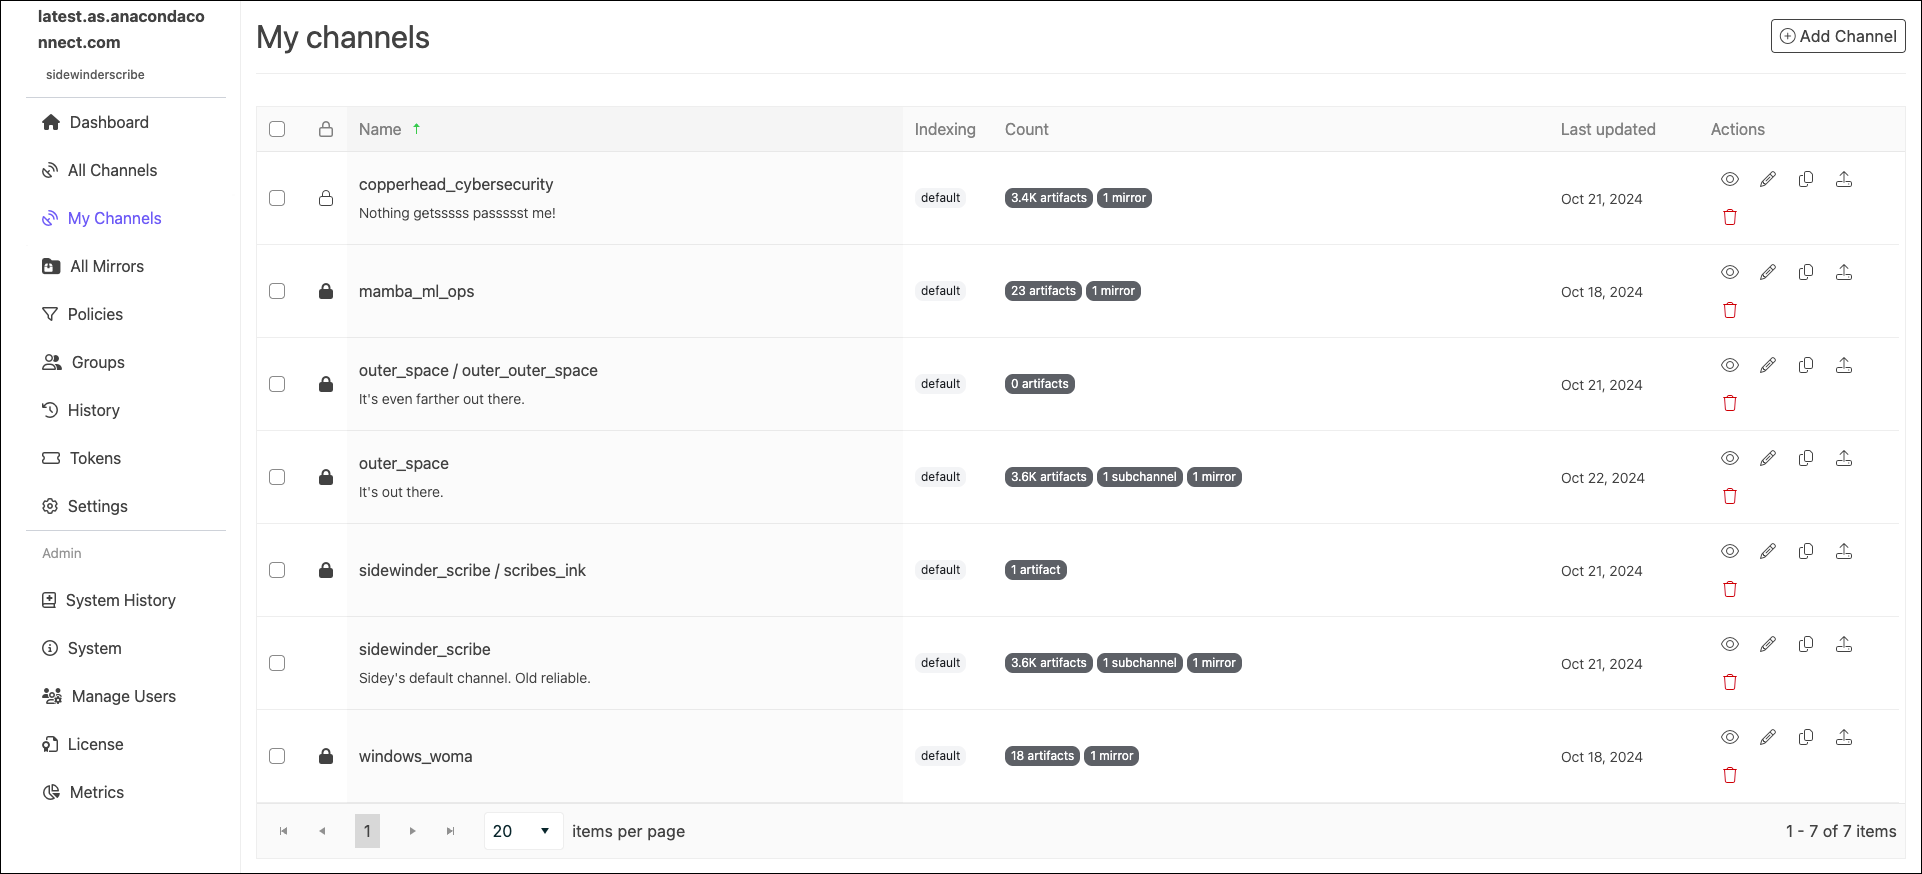
Select My Channels from the left-hand navigation to view channels and subchannels that you have access to. Administrators can view all channels and subchannels for all users from the All Channels page.
Tip
Click Name or Last updated in the table header to sort your channels and subchannels.
Channel actions#
Use the icons in the Actions column to manage your channels:
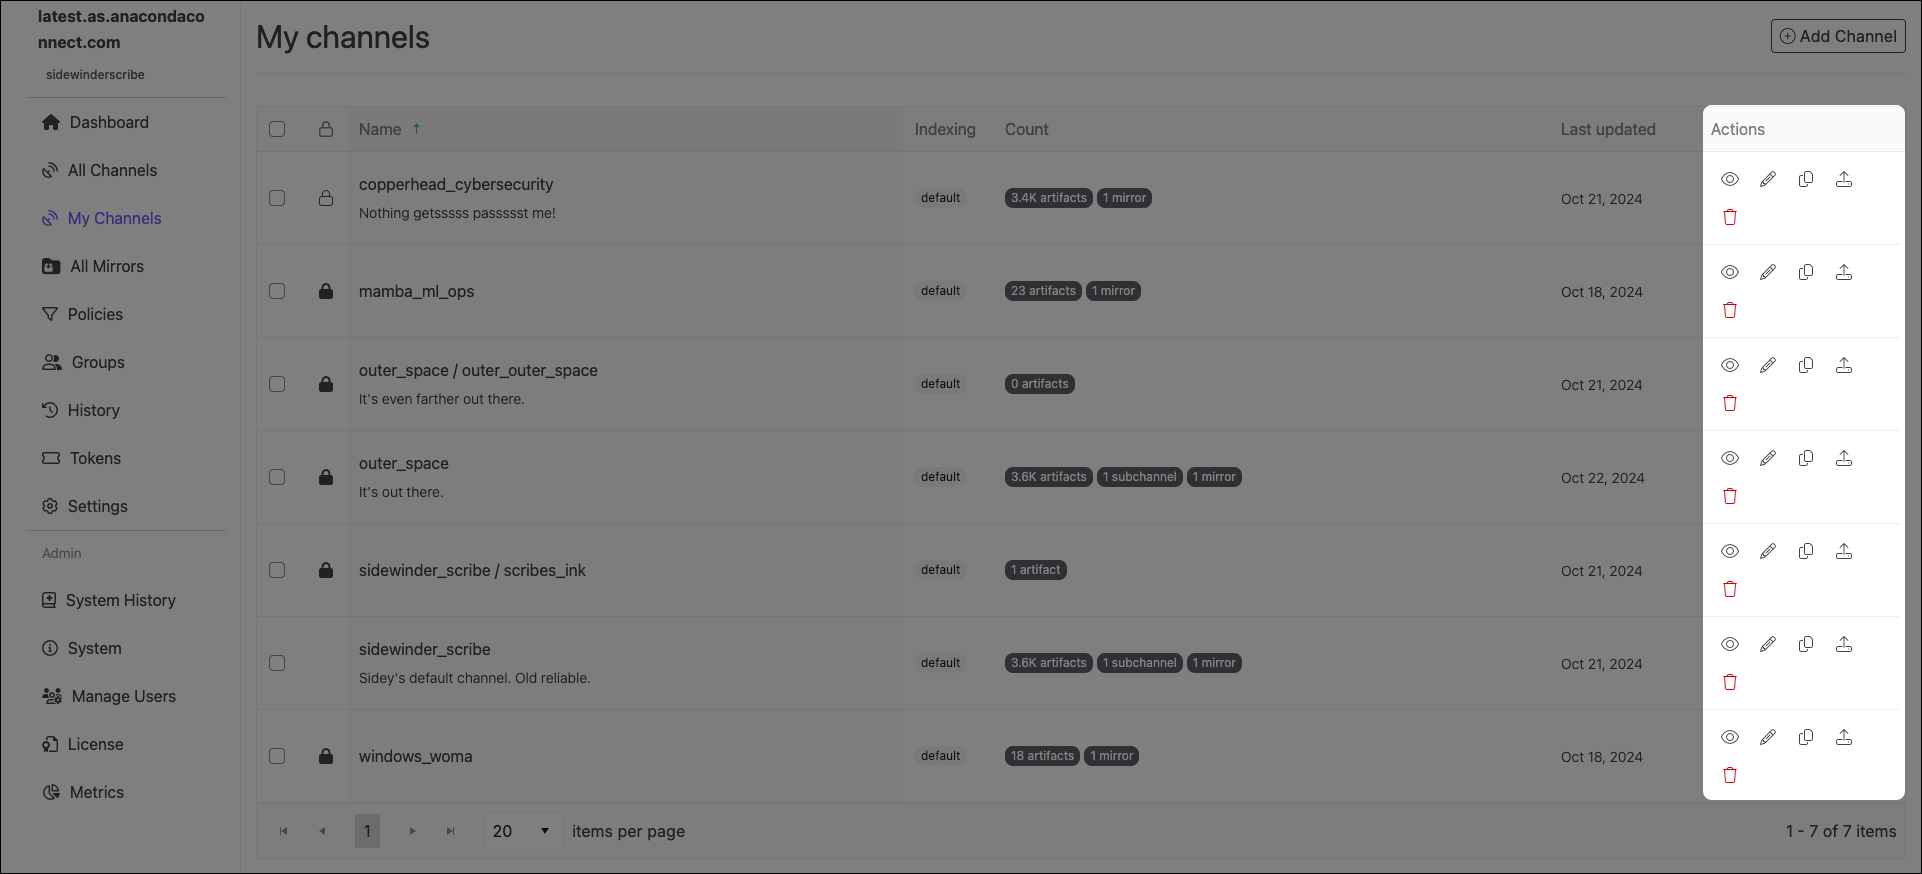
View details - View the Channel Details page. From here, you can view and manage the content of your channel.
Note
Channels and subchannels that have a policy assigned to them display a shield icon beside their name. Click the icon to review the policy applied to the channel. For more information, see Policies.
Select the information icon beside the channel’s name to display its metadata and a CLI command for creating a mirror in this channel from an external source.
Tip
Other channel actions can also be performed from the Channel Details page’s Manage dropdown.
Edit channel - You can edit the name, description, privacy level, notification settings, mirroring filters, and assigned policy for a channel at any time after creation. The Edit channel form is identical to the Create channel form.
Create new mirror - Open the Create mirror form to configure and initiate a new mirror for the channel.
Note
Anaconda recommends only one mirror per channel or subchannel to avoid package source conflicts.
Upload file - Upload a local file to the channel. You can upload the following file types:
Delete channel - Delete the channel and its contents.
Note
You cannot delete a channel that contains subchannels.
You cannot delete your default channel.
Freezing and unfreezing channels#
Creating a mirror consumes a large amount of CPU resources. This is because, each time an artifact is added to the channel from the mirror, the channel index is rebuilt to add the artifact to the Packages tab of your channel. If you want to conserve or reduce your CPU usage, you can freeze your channel before creating a mirror to prevent the channel index from being rebuilt every time an artifact is registered from the mirror’s source.
Note
Because the channel index is prevented from being built, the Rebuild Index option is disabled while a channel is frozen. Channels and subchannels that are frozen also have the Move and Delete actions disabled for packages, projects, environments, notebooks, and general artifacts. In addition, you cannot Copy packages into a channel that is frozen.
Freezing#
Navigate to the Channel Details page.
Open the Manage dropdown menu and select Freeze.
Click Freeze.
Note
Frozen channels display a Frozen tag on the My channels page and a Frozen indexing status in the channel metadata.
Unfreezing#
Once the mirror completes, unfreeze the channel to rebuild the channel index. To unfreeze a channel:
Navigate to the Channel Details page.
Open the Manage dropdown menu and select Unfreeze.
Click Unfreeze.
Note
It can take some time for packages to appear in the Packages tab. As a general rule, the larger the repository, the longer the wait.
If you unfreeze your channel before your mirror completes, the indexing operations for artifacts registered while the channel was frozen will occur simultaneously. Once those indexing operations are complete, the mirror resumes performing normal indexing operations for artifacts as they are registered from the mirror’s source until it completes.
When you freeze a channel, then run a mirror, the History tab will show the mirror starting, artifacts registering, and the mirror completing. Existing packages will not appear in the channel until it is unfrozen.
Note
It is not necessary to freeze the channel again once its mirror has completed. The best practice is to freeze the channel, create your mirror, allow it to complete, then unfreeze the channel.
Viewing channel history#
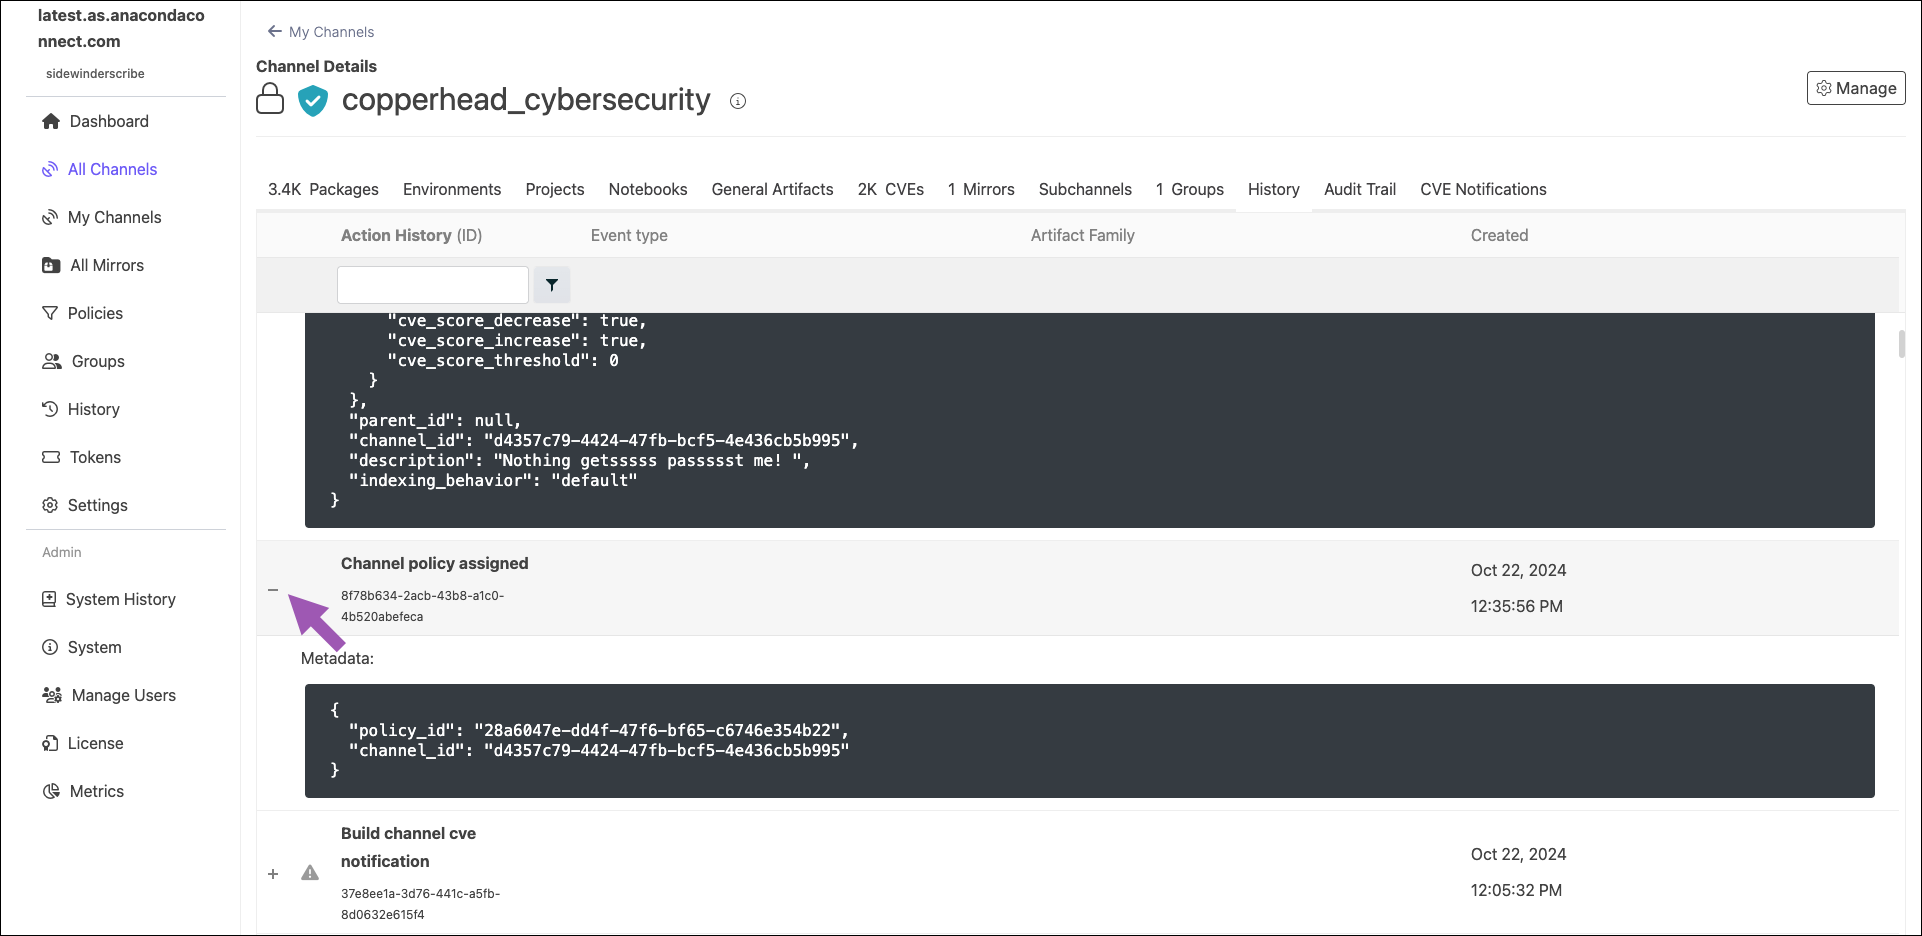
Channel events/actions can be viewed from a channel’s History tab. Events are listed in chronological order by default and include the event ID, type, artifact family (if applicable), and the date/time the event occurred.
Historical events logged in the History tab include:
Channel policy assigned
Channel policy unassigned
Mirror created
Mirror started
Mirror completed
Mirror failed
Mirror stopped
Mirror restarted
Mirror deleted
Artifact registered
Artifact generated
Artifact removed
Artifact metadata updated
Setting your default channel#
Note
This view is only available to users whose role provides Manage permissions for the Default Channel category.
Select Settings from the left-hand navigation.
Update the current entry in the Default Channel field.
Click Save.
Rebuilding your channel index#
The channel index is automatically rebuilt when certain actions, such as adding or deleting a package, are made. However, if you need to manually rebuild your channel’s index for any reason, follow these steps:
Navigate to the Channel Details page.
Open the Manage dropdown menu and select Rebuild Index.
Channel change log#
Sometimes, due to newly reported CVEs or an updated CVE score or status, the contents of your channel will change when the mirror performs its scheduled run. A package may become available that was not available previously, or you could discover that a package you’ve been using is removed from your channel entirely!
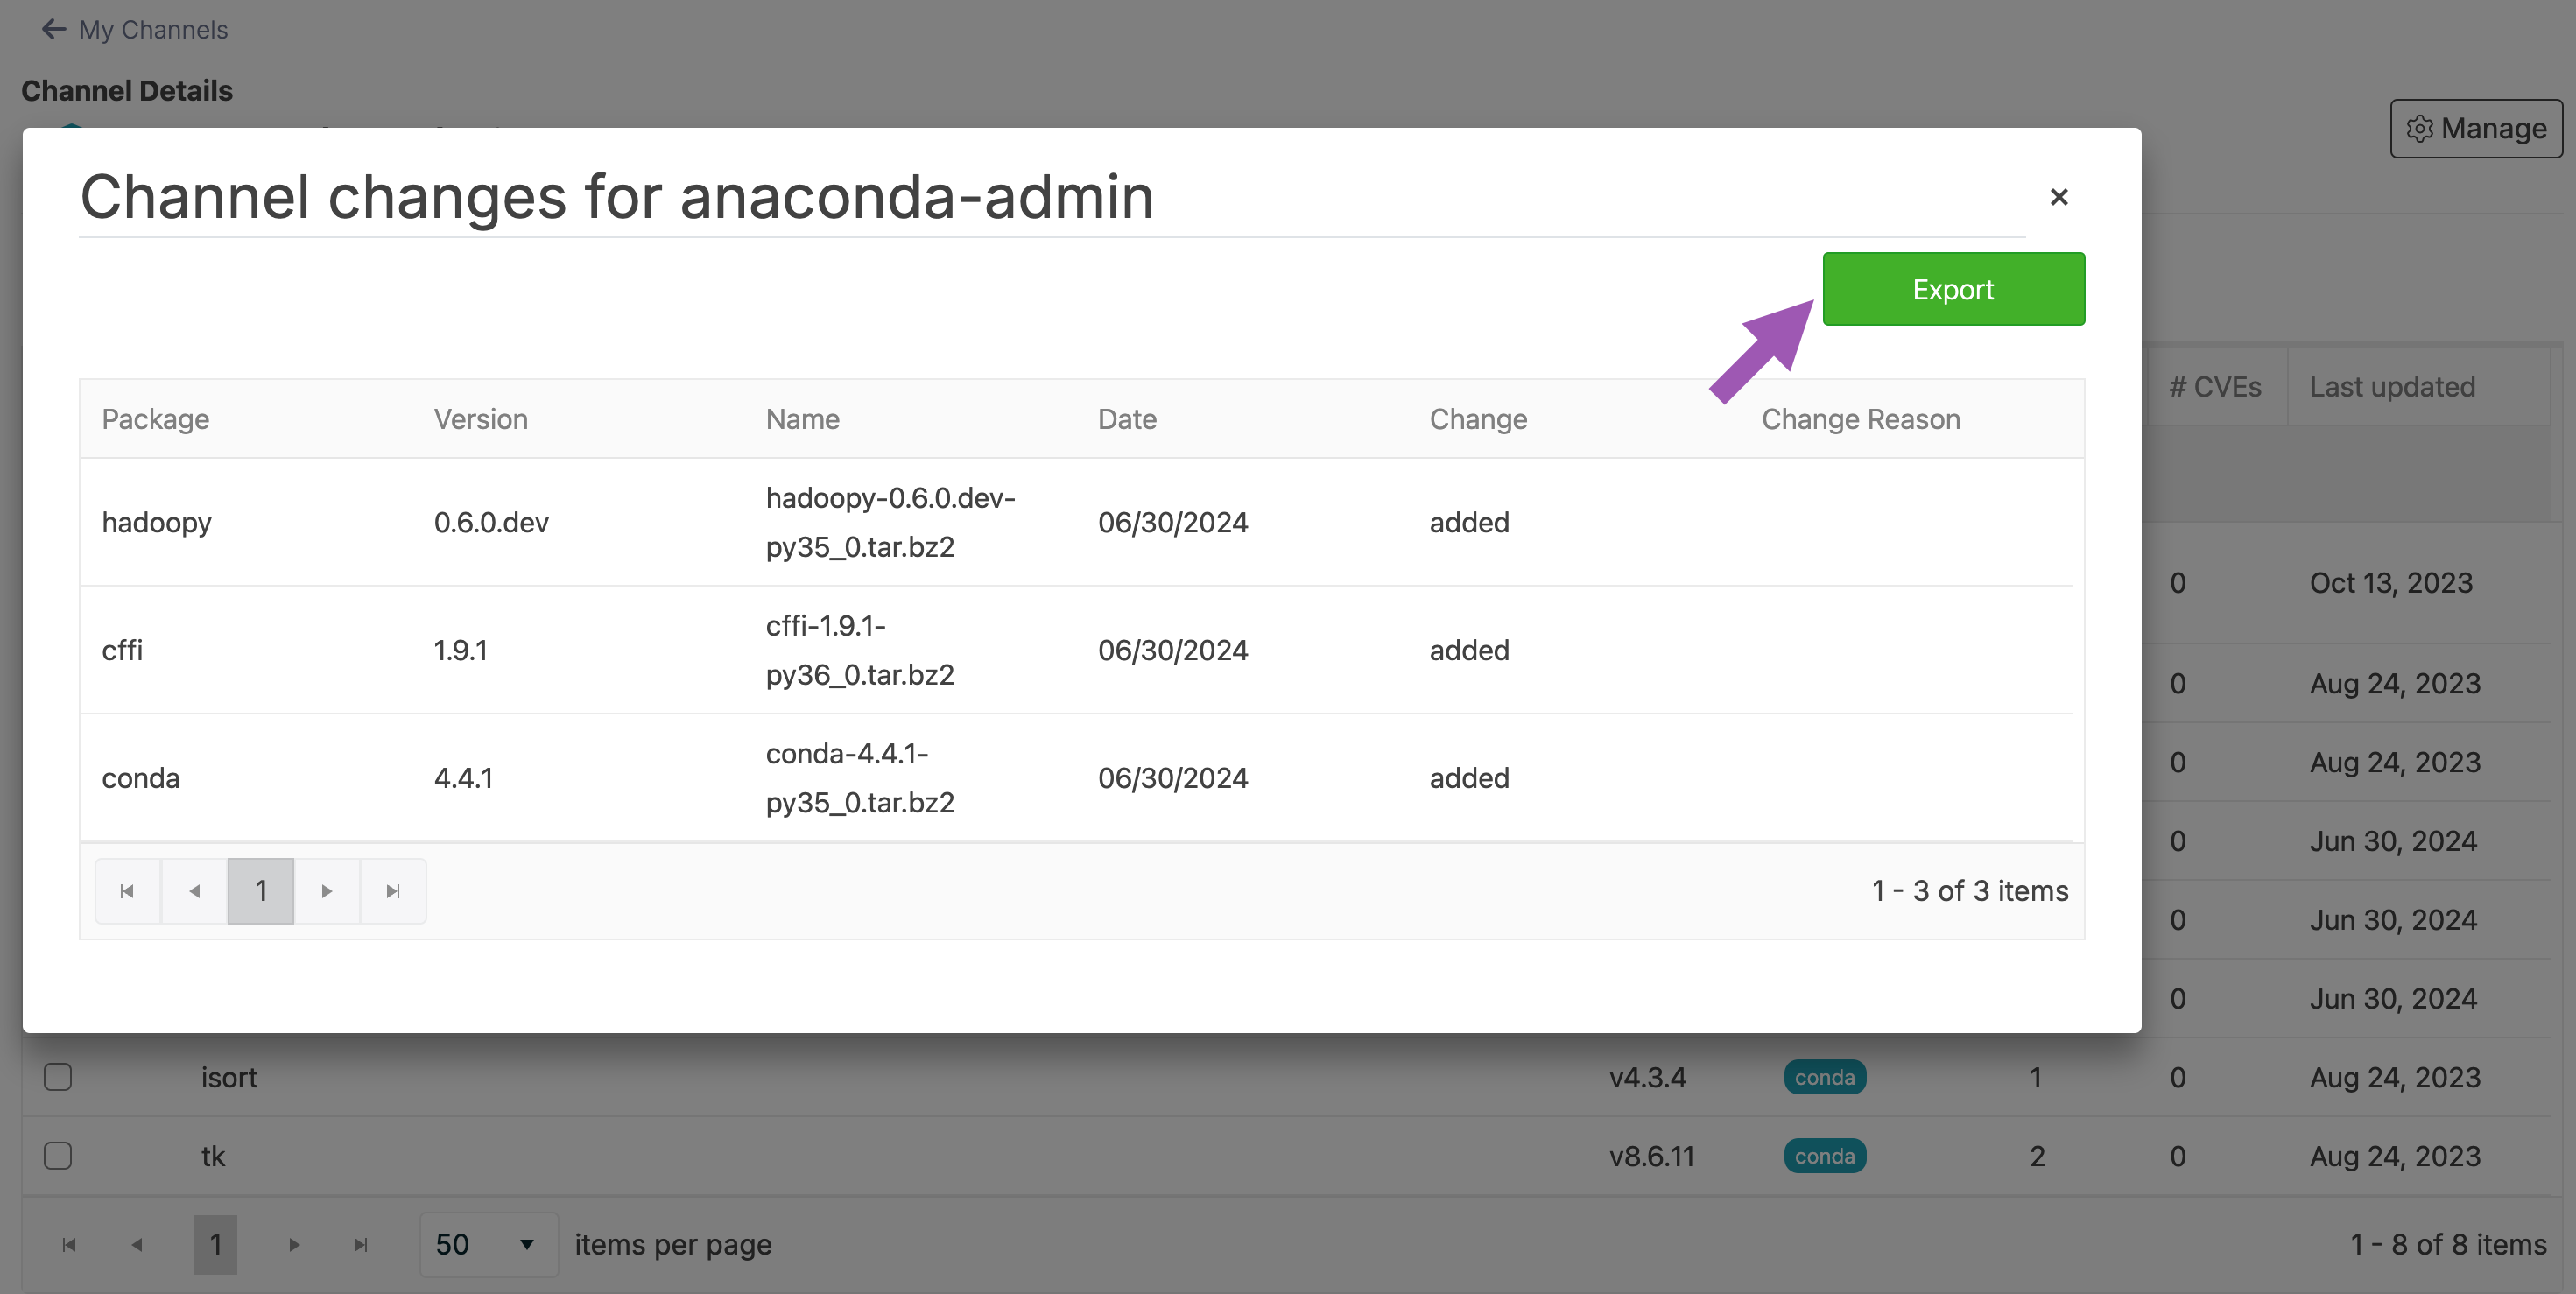
The channel change log shows a record of all package additions and removals within a channel, and provides a reason why the package was added or removed. Packages that are manually moved, copied, or deleted will also appear in the channel change log.
To view the channel change log:
Navigate to the Channel Details page.
Open the Manage dropdown menu and select Channel Changes.
Click Export to download an
.xlsxfile of your channel changes.
Configuring the blob cleanup tool#
The blob cleanup tool removes artifacts associated with deleted channels to free disc space. In other words, if you delete a channel, and it was the only source of specific artifacts, they will be deleted along with the channel. If an artifact in the deleted channel also exists in another channel, it will not be deleted.
By default, the blob cleanup tool runs once a day at midnight. Administrators can customize the schedule by configuring a valid cron expression in the docker-compose.yml file. To customize this configuration:
Open a terminal.
Log in to your Package Security Manager instance.
Navigate to your Anaconda installer directory (
ate-installer-*) by running the following command:# Replace <INSTALLER_DIR> with your installer directory cd <INSTALLER_DIR>
Tip
Start typing
ate-installer-in your terminal, then press Tab to autocomplete the directory name.Open your
docker-compose.ymlfile.Find the
REPO_SCHEDULE_CLEANUP_BLOBS_CRON=<CRON_EXPRESSION>line and replace the<CRON_EXPRESSION>with a valid cron expression, then save it.Restart your instance to apply the changes by running the following commands:
docker compose down
docker compose up -d
You can also run the blob cleanup tool using the API at any time.
Note
By default, the blob cleanup tool does not clear index files generated due to mirroring.
Managing channels with the CLI#
If you want to create and manage your channels using the CLI, see Package Security Manager (On-prem) CLI
Managing channels with the API#
You can also use the API to perform various functions for channels and subchannels. Access the API interface and view the API documentation by logging in as an administrator user, opening a new tab, and then navigating to http(s)://<FQDN>/swagger/ui, replacing <FQDN> with your Package Security Manager fully qualified domain name.
The following is a list of available endpoints you can use to manage your channels in Package Security Manager.
Viewing channels you can access#
GET /api/channels/
GET /api/account/channels
Creating a channel#
POST /api/channels
Creating a subchannel#
POST /api/channels/<CHANNEL_NAME>/subchannels
Viewing channel details#
GET /api/channels/<CHANNEL_NAME>
GET /api/channels/<CHANNEL_NAME>/artifacts
GET /api/channels/<CHANNEL_NAME>/history
GET /api/channels/<CHANNEL_NAME>/mirrors
GET /api/channels/<CHANNEL_NAME>/subchannels
Viewing subchannel details#
GET /api/channels/<CHANNEL_NAME>/subchannels/<SUBCHANNEL_NAME>
GET /api/channels/<CHANNEL_NAME>/subchannels/<SUBCHANNEL_NAME>/artifacts
GET /api/channels/<CHANNEL_NAME>/subchannels/<SUBCHANNEL_NAME>/history
GET /api/channels/<CHANNEL_NAME>/subchannels/<SUBCHANNEL_NAME>/mirrors
Editing a channel#
PUT /api/channels/<CHANNEL_NAME>
Editing a subchannel#
PUT /api/channels/<CHANNEL_NAME>/subchannels/<SUBCHANNEL_NAME>
Deleting a channel#
DELETE /api/channels/<CHANNEL_NAME>
Deleting a subchannel#
DELETE /api/channels/<CHANNEL_NAME>/subchannels/<SUBCHANNEL_NAME>
Running the blob cleanup tool#
DELETE /api/system/blob_cleanup
POST /api/system/blob_cleanup
POST /api/diagnose/blobs
Channel service accounts#
GET /api/users
GET /api/channels/<CHANNEL_NAME>/service-accounts
GET /api/channels/<CHANNEL_NAME>/subchannels/<SUBCHANNEL_NAME>/service-accounts
CRUD /channels/<CHANNEL_NAME>/service-accounts/<USER_ID>/tokens
CRUD /channels/<CHANNEL_NAME>/subchannels/<SUBCHANNEL_NAME>/service-accounts/<USER_ID>/tokens

