Troubleshooting#
This page details some common issues and their respective workarounds. For Anaconda installation or technical support options, visit our support offerings page.
403 error#
Problem#
A 403 error is a generic Forbidden error issued by a web server in the event the client is forbidden from accessing a resource.
The 403 error you are receiving may look like the following:
* Collecting package metadata (current_repodata.json): failed
* UnavailableInvalidChannel: The channel is not accessible or is invalid.
        * channel name: pkgs/main
        * channel url: https://repo.anaconda.com/pkgs/main
        * error code: 403

        * You will need to adjust your conda configuration to proceed.
        * Use `conda config --show channels` to view your configuration's current state, and use `conda config --show-sources` to view config file locations.
- There are several reasons a 403 error could be received:
The user has misconfigured their channels in their configuration (for example, the secure location where the token is stored was accidentally deleted (most common)
A firewall or other security device or system is preventing user access (second most common)
We are blocking their access because of a potential terms of service violation (third most common)
Solution#
First, run the following to undo your configuration of Anaconda Professional:
conda config --remove-key default_channels
Next, install or upgrade the conda-token tool:
conda install --freeze-installed conda-token
Lastly, re-apply the token and configuration settings:
# Replace <TOKEN> with your token
conda token set <TOKEN>
If this doesn’t resolve the issue, Anaconda recommends consulting our Terms of Service error page.
Using Redis#
Cause
By default, Redis does not require a password. Not enabling a password requirement leaves your instance of Anaconda Server vulnerable.
Solution
Follow these steps to password protect your instance:
In the installation directory, update
config/nginx/conf.d/repo.confto include theadd_headerdirective somewhere in theserverblock:server { ... add_header Strict-Transport-Security "max-age=31536000; includeSubDomains" always; ... }
Create a directory called
redisin the configs directory:mkdir -p config/redis
Create a file called
redis.confinsideconfig/rediswith the following contents:requirepass "mypassword"
Update the
docker-compose.ymlfile of TE installation to mount this custom redis config:redis: image: ${DOCKER_REGISTRY}redis-ubi:${VERSION} restart: always volumes: - ${BASE_INSTALL_DIR}/config/redis/redis.conf:/usr/local/etc/redis/redis.conf command: - /usr/local/etc/redis/redis.conf #Alternative: # redis: # image: ${DOCKER_REGISTRY}redis-ubi8:${VERSION} # restart: always # ports: # - 6379:6379 # command: # - /usr/local/bin/redis-server # - --requirepass mypassword # If you use this alternative configuration, there's no need to create a config/redis/redis.conf file to mount in.Update
REDIS_ADDRvariable in.envfile to include password:... REDIS_ADDR=redis://:mypassword@redis:6379/0 ...
Restart docker-compose services so changes are picked up. You can do this using:
docker-compose up -d
Error message on initial login to Anaconda Server#
If you receive an error on your initial login to Anaconda Server and are unable to set your license, it is likely that you have forgotten to include a default user during your installation command, and your current user lacks the administrative permissions necessary to register your license.
To correct this issue:
Navigate to the dev realm.
Select Users from the left-hand navigation.
Create a user or select an existing user from the list to view their profile page.
Select the Role Mapping tab.
Click Assign role.
Select the admin role, then click Assign.
Return to Anaconda Server and log in as this admin user.
Set your license.
Backup fails with exit status 1#
If you attempt to run the backup command and receive an error in dumping the repo database with exit status 1 returned by the command, complete the following procedure:
Connect to your instance of Anaconda Server. If necessary, get help from your IT department with this step.
Open your installation directory by running the following command:
# Replace <INSTALLER_DIRECTORY> with the location of your file directory
cd <INSTALLER_DIRECTORY>
Open your
docker-compose.ymlfile using your preferred file editor.Find the
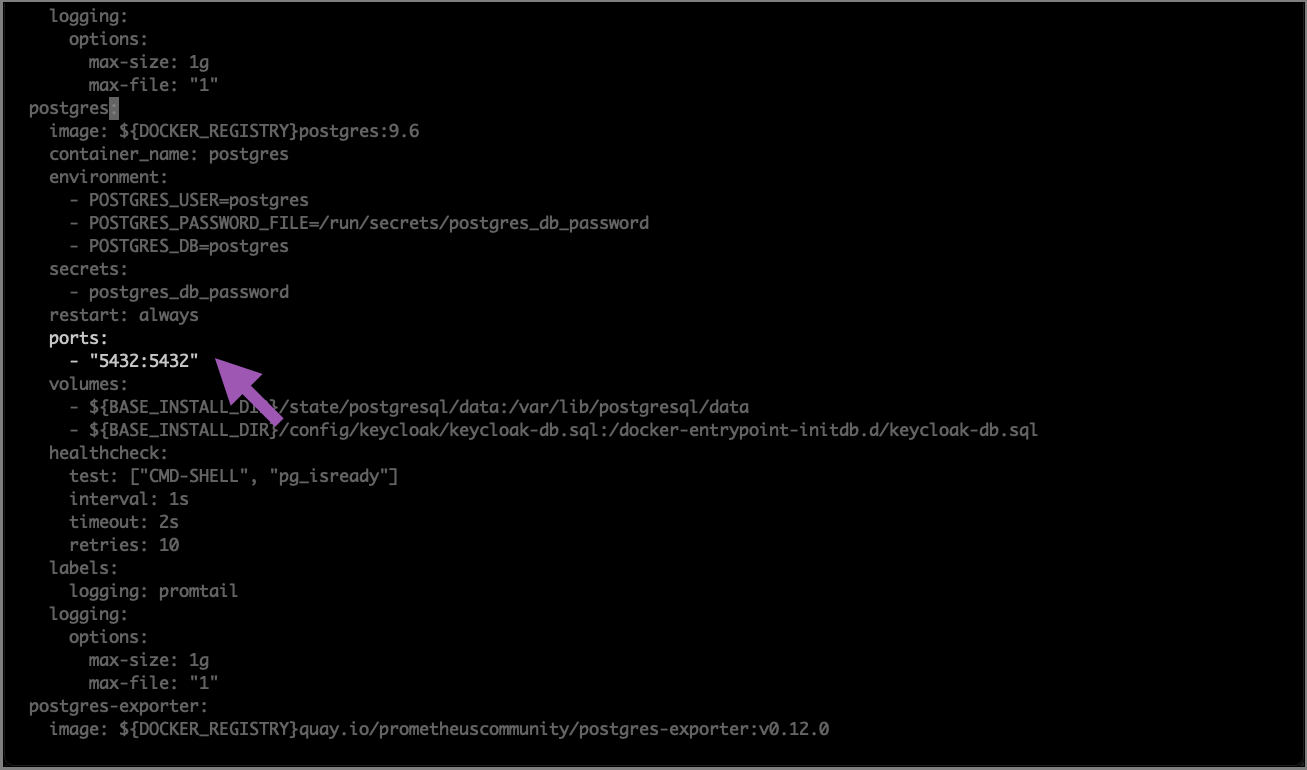
postgres:section of the file.Replace the following portion of the
postgres:configurations:expose: - "5432"
With this:
ports:
  - "5432:5432"
Here is an example of what your file should look like when you are finished:

Retry the backup command.